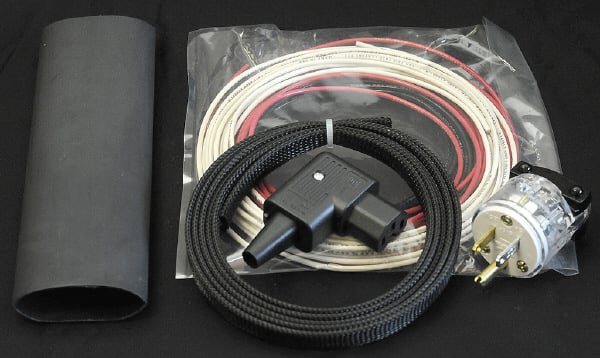

Parts:
- 2x 7′ lengths each of Black, White, Red wire
- 6’ Techflex
- 8” Heat Shrink
- 1 right angle IEC pleg
- 1 Hospital Grade AC wall plug
Tools Needed:
- Wire strippers (20 awg)
- Slotted screwdriver (some of the screws are combo and allow use of a Phillips)
- Scissors
- Wire cutters
- Clamp or vise
- Power Drill (or a second clamp)
- Multimeter, preferably with a continuity test
- Heat gun (a real one, not a hair dryer)
- Ruler
1. Take the Black pair of wires and clamp one end to the bench or in a vise.
2. At the other end put the free wires into the chuck of your drill and tighten. You could also use a C-clamp for this, but twisting the wire by hand will be tedious.

3. Twist the wire with the drill clockwise until you have approximately 3 turns per inch. It may unwind a few turns when you release it, that is fine.

4. Now repeat this clockwise twisting process using one White wire and one Red wire as a pair. With the remaining two wires (one Red and one White) you will do the same as the other two pairs, only twist this pair counter-clockwise.

5. Once you have your 3 twisted pairs match up one end of each, even up these wires and clamp them to the bench/vise. Braid these three twisted pairs by hand as shown. Don’t know how to braid? Here’s a link.

6. Once you are done braiding, trim the ends so that all wires are even on both ends. Now slip the Techflex over one end and work it to the other end so that there is 3” or so of exposed braid to work with.

7. Untwist 2.5” of this braided wire at one end and straighten out the twists a bit.
Cut the Heat shrink equally into two 4″ lengths and slide both over the Techflex to around mid cable (do not heat this yet).

8. Loosen the single screw and lift the cover off of the right angle plug. Remove the strain relief and loosen cable clamp so that it hangs freely as shown.

9. Push the six untwisted, evenly trimmed wires into the narrow end of the strain relief until 2 1/4” of wire protrudes through the other, square shaped end as shown.

10. Strip each wire ¼” inch and twist each color matched pair of wires together (Red with Red, White with White, Black with Black).
11. Remove the three metal connectors, and loosen their set screws. Insert the wires as shown and tighten each set screw.
12. Install the metal connectors back into recepticle exactly as shown (Red for live, Black for ground and White for neutral).The positions of the live, ground and neutral connectors are marked inside the plug just behind where the connectors sit.
Note: We are aware that these wire colors are not the standard ones used for live and ground. This economical power cord kit has been made possible by our error in purchasing a large quantity of stranded wire in these colors. As long as you carefully make sure that the wires are connected as described and you follow the checkout procedure below the cord will function properly, and the Techflex will cover the wire colors.

13. Mount the strain relief into its slot and pull any slack wire back through the relief, being careful to route the wires in the plug shell so that the cover screw hole is not blocked. Now you can screw down the cable hold down and re-attach the cover.

14. Ensure all wires are even on the remaining end. Untwist and straighten about 2″ of wire and strip all wires 1/4″. Loosen the front three screws from the AC plug and pull the front free from the housing.

15. Loosen the housing clamp and route the wires through. Again twist the wires together for each color matched pair and connect the wires to the plug as shown in the next three photos.

16. Black wire connects to the green screw on the ground prong of the plug.

17. The White wire connects to the silver colored screw on the neutral blade of the plug.

18. The Red wire connects to the gold colored screw on the live blade of the plug.

19. Re-attach the housing to the front ot the AC plug and tighten the cable clamp screws. Now use your multimeter to verify continuity of the live receptacle of the IEC plug to the live blade of the AC plug as shown.

20. Verify continuity of the neutral receptacle of the IEC plug to the neutral blade of the AC plug as shown below.

21. Verify continuity of the ground receptacle of the IEC plug to the ground prong of the AC plug as shown.

22. Run your hand over the cable and smooth out the Techflex so there is an even amount at both ends (should be any where from 0 to 2″ or so of exposed wire at each end. If you have too much Techflex and it’s bunching up use some scissors or side-cutters and trim excess.

23. Place the heat-shrink over the IEC plug and cable as shown.

24. Turn the heat gun on it’s high setting (If you have a dual temp gun). This 3:1 shrink tubing is pretty rugged and takes some time to shrink up, but makes for a nice firm connection and acts as a secondary strain relief when done. Take your time working the heat mainly around the plug end at first and slowly working it up towards the cable side. Be very careful around the Techflex as it will melt fairly quickly under the direct heat of your gun.

25. Once you can see that the shrink is done shrinking, stop and let it cool for several minutes. You can push the Techflex down toward the shrink tubing in order to expand it while the glue is still liquid to get a nice even seal between the techflex and the shrink tubing.

26. The AC plug should have the shrink tube pushed up about as far as is shown here before heating.

27. The finished AC plug after heating. Let this end cool for 10 or 15 minutes and your new power cord will be ready to attach to your Bottlehead amp or preamp.

This power cord is 17 gauge and we have used the conservative “700 circular mils per ampere” formula to rate it at 3 amps. It may work at two to three times that current draw, but we do not condone nor guarantee the cord’s use at currents higher than 3 amperes.

Share:
A New Chapter for Bottlehead